基于nRF52832 SoC的RedBear BLE Nano v2物联网开发板初体验
IoT大杀器nRF52832

nRF52832 SoC芯片主要参数:
- ARM Cortex-M4,32-bit
- 最大主频64 MHz
- 内部闪存512kB
- SRAM达到64kB
- 支持Bluetooth 5和NFC
- 支持多种开发环境
相比之下Arduino Uno的ATmega328芯片的主频才16MHz,Flash 32kB,SRAM 2kB,不带任何无线功能。对比强烈。
Nordic的官方组件评测可以看:
一款基于Cortex-M4的BLE SoC——Nordic nRF52开发套件评测_搜狐科技_搜狐网
Arduino也推出了Primo这个板子:
Arduino使用Nordic nRF52832 SoC的Arduino Primo基板-通信/网络-与非网
RedBear BLE Nano Kit v2
入手的是RedBear推出的超小型开发板。小巧全能就是王道!
这个板子虽然是某香港/深圳公司做的,中文世界的介绍几乎没有,RedBear的人看到此文不介意给本人支付广告费(@HᴗP@)。
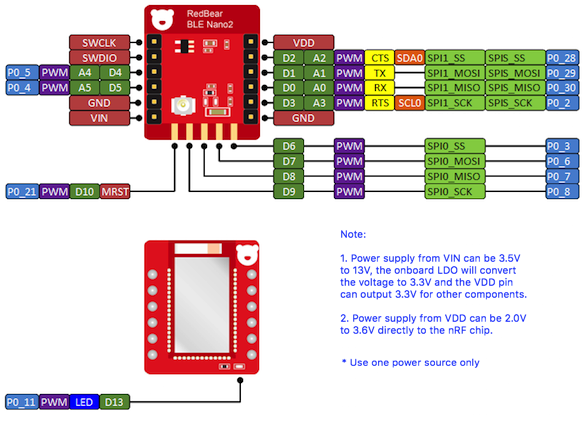
nRF52832的特性之外,还有:
- Arduino IDE,Mbed,JavaScript,Nordic nRF52 SDK,Python,Apache Mynewt,FreeRTOS等开发环境
- 板载LED D13
- UART,SPI,I2C
- 最大11个端口,也足够用了
- VDD除了3.3V,还支持1.8V的输出
- 可以在1.8V-3.6V工作
- 大小只有大概2厘米见方
- 支持Over-The-Air,也就是不连电脑直接通过BLE写程序

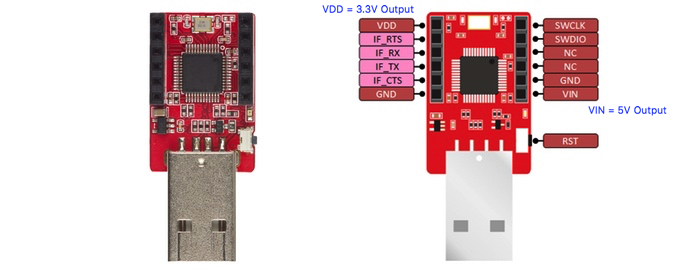
还有官方Kit,多了USB读写器DAPLink
开发板介绍:
Kickstarter page
nRF5x/nRF52832 at master · redbear/nRF5x · GitHub
RedBear (注意:官网是找不到Nano2介绍页面的=͟͟͞͞(HㅍP),只有
基于nRF51832的一代Nano的介绍,两代非常不同 )
官方还有扩展板
RedBear BLE Nano Kit v2开箱

可以看到其实BLE Nano的板子只比USB插口大了一点点,大概就是正常人的拇指那么大吧。下面作对比的是ESP32。
插电前必须注意插入读写器的方向,白色的小熊logo是朝外的。
插电后就可以进行BLE测试,本来已经预先安装了心率服务:nRF5x/Getting_Started_Guide.md at master · redbear/nRF5x · GitHub
windows系统可能需要先安装mbed的驱动:https://developer.mbed.org/handbook/Windows-serial-configuration
Arduino IDE追加库
按照官方介绍操作:nRF5x/Arduino_Board_Package_Installation_Guide.md at master · redbear/nRF5x · GitHub
- 先在设置那里添加链接:https://redbear.github.io/arduino/package_redbear_nRF5x_index.json
- 然后在Boards Manager里面搜索RedBear nRF52832
安装完了之后就可以看到IDE里面出现了BLE_Nano2的板子,注意不要搞混一代Nano和二代了,两者不通用。
这时候可以进行Arduino标准的LED测试,记得端口换成D13就行。
BLE Simple Chat测试
先安装官方的APP:BLEController
Arduino IDE里面打开File>Examples>BLE_Examples>SimpleChat并上传
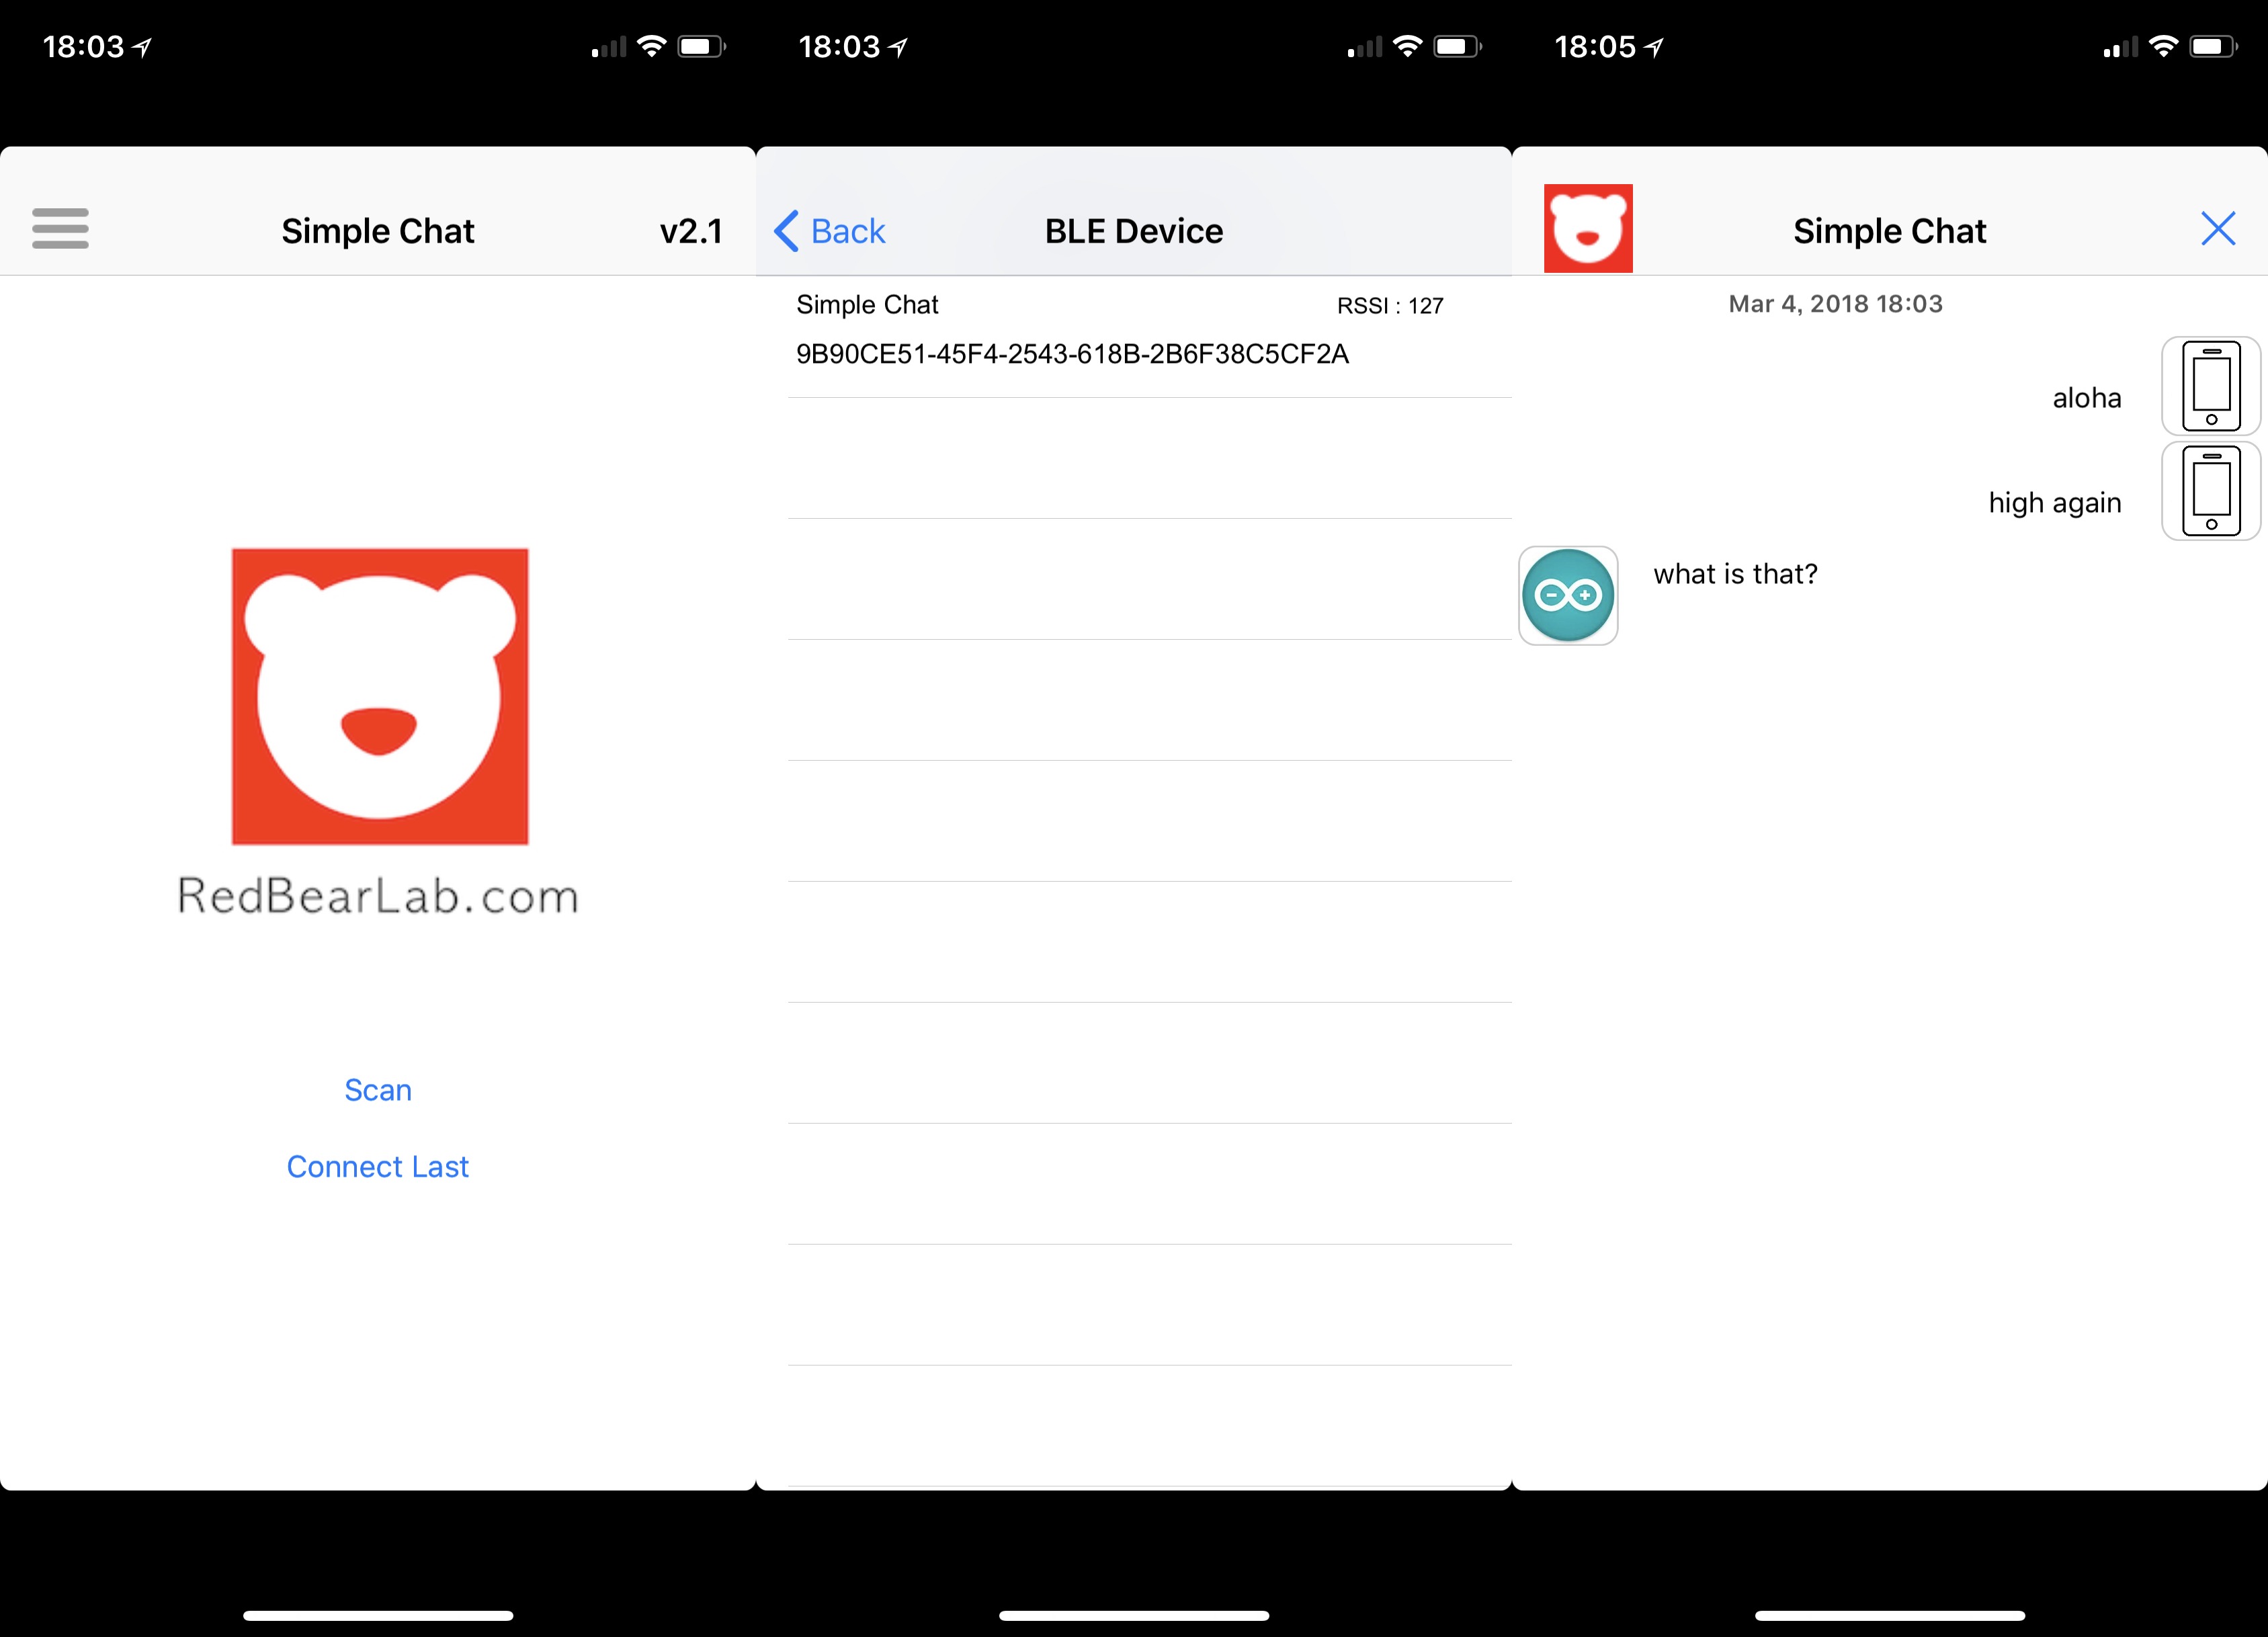
官方APP里面找到设备并连接,
在手机里面输入文字,Serial Monitor里面就有反应。

反过来Serial Monitor里面输入文字,手机就有输出。
实现简单的文字传输功能。
并非Arduino风格的BLE语法
好了,用是可以使用,看一下具体代码的话就会发现,BLE部分的语法并不是一般arduino里面常用的那种,而是类似mbed的语法,这个说明又是一个大坑了。
另外可以用Nordic SDK,自由度更高,开发HID等高级功能逃不过,当然这个坑更大更深。
/*
 * Copyright (c) 2016 RedBear
 *
 * Permission is hereby granted, free of charge, to any person obtaining a copy of this software and associated documentation files (the "Software"),
 * to deal in the Software without restriction, including without limitation the rights to use, copy, modify, merge, publish, distribute, sublicense,
 * and/or sell copies of the Software, and to permit persons to whom the Software is furnished to do so, subject to the following conditions:
 *
 * The above copyright notice and this permission notice shall be included in all copies or substantial portions of the Software.
 *
 * THE SOFTWARE IS PROVIDED "AS IS", WITHOUT WARRANTY OF ANY KIND, EXPRESS OR IMPLIED, INCLUDING BUT NOT LIMITED TO THE WARRANTIES OF MERCHANTABILITY,
 * FITNESS FOR A PARTICULAR PURPOSE AND NONINFRINGEMENT. IN NO EVENT SHALL THE AUTHORS OR COPYRIGHT HOLDERS BE LIABLE FOR ANY CLAIM, DAMAGES OR OTHER
 * LIABILITY, WHETHER IN AN ACTION OF CONTRACT, TORT OR OTHERWISE, ARISING FROM, OUT OF OR IN CONNECTION WITH THE SOFTWARE OR THE USE OR OTHER DEALINGS
 * IN THE SOFTWARE.
 */
#include <nRF5x_BLE_API.h>

#define DEVICE_NAME            "BLE_Peripheral"   // 被搜索的时候看到的名字
#define TXRX_BUF_LEN           20      // 这个是BLE每次传输缓冲的最大字节数,最大20

BLE                            ble;
Timeout                        timeout;

static uint8_t rx_buf[TXRX_BUF_LEN];  // 这个是BLE每次传输缓冲的最大字节数,最大20
static uint8_t rx_buf_num;
static uint8_t rx_state=0;

// 需要自己定义16进制的uuid
// The uuid of service and characteristics
static const uint8_t service1_uuid[]        = {0x71, 0x3D, 0, 0, 0x50, 0x3E, 0x4C, 0x75, 0xBA, 0x94, 0x31, 0x48, 0xF1, 0x8D, 0x94, 0x1E};
static const uint8_t service1_tx_uuid[]     = {0x71, 0x3D, 0, 3, 0x50, 0x3E, 0x4C, 0x75, 0xBA, 0x94, 0x31, 0x48, 0xF1, 0x8D, 0x94, 0x1E};
static const uint8_t service1_rx_uuid[]     = {0x71, 0x3D, 0, 2, 0x50, 0x3E, 0x4C, 0x75, 0xBA, 0x94, 0x31, 0x48, 0xF1, 0x8D, 0x94, 0x1E};
static const uint8_t uart_base_uuid_rev[]   = {0x1E, 0x94, 0x8D, 0xF1, 0x48, 0x31, 0x94, 0xBA, 0x75, 0x4C, 0x3E, 0x50, 0, 0, 0x3D, 0x71};

uint8_t tx_value[TXRX_BUF_LEN] = {0,};
uint8_t rx_value[TXRX_BUF_LEN] = {0,};

// Initialize value of chars
GattCharacteristic  characteristic1(service1_tx_uuid, tx_value, 1, TXRX_BUF_LEN, GattCharacteristic::BLE_GATT_CHAR_PROPERTIES_WRITE | GattCharacteristic::BLE_GATT_CHAR_PROPERTIES_WRITE_WITHOUT_RESPONSE );      // 定义特征的读写权限等
GattCharacteristic  characteristic2(service1_rx_uuid, rx_value, 1, TXRX_BUF_LEN, GattCharacteristic::BLE_GATT_CHAR_PROPERTIES_NOTIFY);
GattCharacteristic *uartChars[] = {&characteristic1, &characteristic2};
GattService         uartService(service1_uuid, uartChars, sizeof(uartChars) / sizeof(GattCharacteristic *));

// BLE断开后的操作
void disconnectionCallBack(const Gap::DisconnectionCallbackParams_t *params) {
  Serial.println("Disconnected!");
  Serial.println("Restarting the advertising process");
  ble.startAdvertising();  // 开始advertising
}

// central设备有write请求时候的操作
void gattServerWriteCallBack(const GattWriteCallbackParams *Handler) {
  uint8_t buf[TXRX_BUF_LEN];
  uint8_t index;
  uint16_t bytesRead = TXRX_BUF_LEN;

  Serial.println("onDataWritten : ");
  if (Handler->handle == characteristic1.getValueAttribute().getHandle()) {
    // 读出特征的数据
ble.readCharacteristicValue(characteristic1.getValueAttribute().getHandle(), buf, &bytesRead);
    Serial.print("bytesRead: ");
    Serial.println(bytesRead, HEX);
    for(index=0; index<bytesRead; index++) {
      Serial.write(buf[index]);
    }
    Serial.println("");
  }
}

void m_uart_rx_handle() {   //update characteristic data
  ble.updateCharacteristicValue(characteristic2.getValueAttribute().getHandle(), rx_buf, rx_buf_num);
  memset(rx_buf, 0x00,20);
  rx_state = 0;
}

void uart_handle(uint32_t id, SerialIrq event) {   /* Serial rx IRQ */
  if(event == RxIrq) {
    if(rx_state == 0) {
      rx_state = 1;
      timeout.attach_us(m_uart_rx_handle, 100000);
      rx_buf_num=0;
    }
    while(Serial.available()) {
      if(rx_buf_num < 20) {
        rx_buf[rx_buf_num] = Serial.read();
        rx_buf_num++;
      }
      else {
        Serial.read();
      }
    }
  }
}

void setup() {
  // put your setup code here, to run once
  Serial.begin(9600);
  Serial.attach(uart_handle);

  ble.init();
  ble.onDisconnection(disconnectionCallBack);
  ble.onDataWritten(gattServerWriteCallBack);

  // setup adv_data and srp_data
  ble.accumulateAdvertisingPayload(GapAdvertisingData::BREDR_NOT_SUPPORTED);
  ble.accumulateAdvertisingPayload(GapAdvertisingData::SHORTENED_LOCAL_NAME,
                                   (const uint8_t *)"TXRX", sizeof("TXRX") - 1);
  ble.accumulateAdvertisingPayload(GapAdvertisingData::COMPLETE_LIST_128BIT_SERVICE_IDS,
                                   (const uint8_t *)uart_base_uuid_rev, sizeof(uart_base_uuid_rev));
  // set adv_type
  ble.setAdvertisingType(GapAdvertisingParams::ADV_CONNECTABLE_UNDIRECTED);
  // add service
  ble.addService(uartService);
  // set device name
  ble.setDeviceName((const uint8_t *)"Simple Chat");
  // set tx power,valid values are -40, -20, -16, -12, -8, -4, 0, 4
  ble.setTxPower(4);
  // set adv_interval, 100ms in multiples of 0.625ms.
  ble.setAdvertisingInterval(160);
  // set adv_timeout, in seconds
  ble.setAdvertisingTimeout(0);
  // start advertising
  ble.startAdvertising();
  Serial.println("Advertising Start!");
}

void loop() {
    ble.waitForEvent();
}
诸多参考
BLE Nanoを試してみました - surga Lab
RedBearLab BLE Nano の設定方法とOTA | Home Made Garbage
BLE Car01
blenanov2をarduinoideを使ってプログラミングする方法
【Arduino】BLE NanoでスマートフォンとBLE通信する - おもちゃラボ
ArduinoRedBearLab BLE Nanoを使ってみる : 工作と競馬
BLE NanoではじめてのBLE通信!クラゲのIoTテクノロジー
BLE Nano2ではじめてのBLE通信!クラゲのIoTテクノロジー
BLEnanoで必要なときだけLCDに情報を表示する方法 : 試行錯誤な日々
有事别忘了骚扰官方论坛:BLE Nano 2 (nRF52832) - Discussion Forums
վ HᴗP ի
This blog is under a CC BY-NC-SA 3.0 Unported License
Link to this article: https://hanspond.github.io/2018/03/04/基于nRF52832 SoC的RedBear BLE NANO Kit v2物联网开发板初体验/
